Colourful

Colourful

Thursday, 10 March 2016

DIY Bracelets

 I bought some fimo beads a while ago to make a funky bracelet. I finally finished it last night and it come out just how I wanted it to!
This led to me looking into what other jewellery I could make. I haven’t made jewellery myself before but it could be a fun venture and may lead to some nice birthday gifts. I like pearl jewellery, I think it’s pretty, understated and feminine so I bought a small bag of white and a small bag of cream ‘pearl looking’ glass beads and I can’t wait to see what bits and bobs I can make with them!
The project I want to show you is in the background!

On my many hours of Pinterest browsing I come across a Pearl and Ribbon Pin and thought I would give it a go. So off to the market I went and bought some beautiful ribbon (pale blue and white polka dot and navy blue and white striped) along with other crafty stuff and things but that’s a story for another post!
I started with the light blue and white polka dot ribbon and the cream ‘pearls’. When I looked at the spacing for the ruffle and the ‘pearl’ I realised that the polka dots were perfect for making sure each placement would be the same.  I left 10cm at the start of the bracelet and used really strong thread to start fixing the ‘pearls’ to the ribbon (on forget when you finish with the ‘pearls’ to leave another 10cm on that end for the bow!).
The ribbon I bought is a similar width to my beads so when the ribbon ruffles the ‘pearls’ get the credit they deserve!
I didn’t want pearls all the way around so mine sit on top of my wrist with the ribbon fastening underneath. And you end up with a cute delicate bracelet. I am thinking about restringing it with thin elastic which would make it more secure but still keep it delicate.
I think I’m going to try some wirework, maybe a pearl ring or caged pearl necklace but I haven’t decided yet! Anyway, till next time…


Thursday, 3 March 2016

Candles

I love candles! I buy a lot of candles but it’s disappointing when there is left over wax after the candle is no longer usable, so I collect the leftover wax and make more candles!!!
I buy the wicks online, you can either buy them pre-cut with the metal bottoms or I buy a length that can be cut to whatever size I need. I used to collect pretty jars and then I got into teacup candles but you have to be careful to make sure it doesn’t look like you’ve got you dishes scattered about the house! On my travels the other day I come across these lovely diamond cut glasses that I thought would look beautiful with the light inside catching the pattern in the glass so here you go:

I use an empty metal coffee tin with a lid to collect the scrap wax. Heat a pan of water on the hob and put metal tin into the water. The wax will melt inside the tin.
Dip the metal bit on the end of the wick in the wax to centre and secure it in whatever you are using as a candle (just make sure it can stand the heat), I then tie a bit of cotton to the tip of the wick.
Pour the melted wax into your new candle (be careful, the metal tin will be hot) but retain a bit because when the wax has set it will sink so you will need some to level the top. Then wrap the cotton around a skewer (or fork or pen it doesn’t matter) and balance it on top of your candle, this will ensure the wick doesn’t fall into the wax and make it unusable.


Let it set overnight and re-melt the leftover wax the level out the sink hole.
This is the way I do it but you can buy the wax online or from craft supply stores.

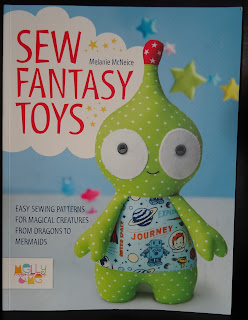
Sew Fantasy Toys

So I bought this book at the end of January and I love it!!!


The patterns are clear and easy to follow and so cute. So I wanted to share with you some of the toys I have made from it so far.


Sew this is the gang! The book is sectioned so you can build your confidence to the more complex patterns which is what I’m doing.


I love these little guys! I haven't finished the dragon yet but I wanted to share this with you. My machine and hand sewing confidence is growing and I am looking forward to my next project.


Today is the last day of the Granny Square Blanket so I now have 40 squares ready to give to my friend. Unfortunately, I don’t think my friends have managed to keep up with my pace. Hopefully I’ll have pictures next week!